
"Méthode de conception pour l'assemblage
basée sur la logique floue
et les modčles géométriques B-Rep"
 OpenCascade
a été sélectionnée comme librairie de développement pour mon projet de Mastčre.
Les fonctions d'OpenCascade m'ont permis de réaliser FuzzyDFA assez rapidement. Cette application
permet de :
OpenCascade
a été sélectionnée comme librairie de développement pour mon projet de Mastčre.
Les fonctions d'OpenCascade m'ont permis de réaliser FuzzyDFA assez rapidement. Cette application
permet de :
OpenCascade a été utilisée pour importer, visualiser, explorer la structure topologique des fichiers pičces...
et bien d'autres fonctions encore. La présentation  PowerPoint
ci-contre (conférence IDMME 2002) aide ŕ comprendre
les intéręts de ce projet et ŕ évaluer ce qui a pu ętre réalisé avec OpenCascade.
PowerPoint
ci-contre (conférence IDMME 2002) aide ŕ comprendre
les intéręts de ce projet et ŕ évaluer ce qui a pu ętre réalisé avec OpenCascade.

Contrôleur optimal de machine outil 5 axes
L'objectif de ce projet est de montrer comment réaliser un contrôleur de machin-outil 5 axes avec différents algorithmes bien connus en robotique. Trois approches algorithmiques sont proposées pour la génération des trajectoires :
La maquette informatique de cette application est réalisée avec OpenCascade. L'originalité réside dans la sélection par l'utilisateur des arętes ŕ parcourir, l'application déduisant automatiquement les points et les normales ŕ la surface. Les algorithmes proposés permettent d'optimiser les valeurs articulaires de la machine. Ceci permet d'usiner des pičces de plus grandes dimensions (i.e. dont l'usinage, sans optimisation, dépasserait les limites articulaires de la machine sans optimisation) et de minimiser les déplacements de la machine. L'animation ci-dessous montre le parcours du contour d'une surface plane.

Deux versions de cette application ont été développées. La premičre est basée sur MFC (animation ci-dessus).
Une documentation complčte (en français) est téléchargeable ici
avec l'exécutable et des exemples ainsi que
les fichiers source (OCC 4.0 requis).
De plus, pour présenter OpenCascade lors d'une conférence  Linux Québec
avec Stéphane Routelous en décembre 2001,j'ai également codé cette application avec Qt2.3.
Celle-ci est présentée en anglais ci-dessous.
Linux Québec
avec Stéphane Routelous en décembre 2001,j'ai également codé cette application avec Qt2.3.
Celle-ci est présentée en anglais ci-dessous.
Optimal Controller for a 5-axis Machine Tool
The project, "Optimal Controller for a 5-axis Machine Tool", aims to demonstrate how to build powerful and robust robotics applications in a simple way with Open CASCADE components. I designed an application capable of calculating the joint coordinates of a 5-axis milling machine using the following three algorithms:

The application is single document. The main frame contains two different views of the same document :
Figure 1 is an illustration of the graphical user interface of the application.
The document file contains all the data required to completely define a milling simulation :
Then, the cutter location coordinates (location and orientation) are appended to the document, as well as the corresponding joint coordinates. The details on the way these coordinates are computed are in section 5.


The "File" menu and its associated toolbar are quite standard. It allows
the creation of a new document, and other typical operations (open…,
save, save as…, exit). When the user creates a new document, a file dialog
window automatically appears to selects a new geometric part. In the current
release of the application, the part is supposed to be well positioned
relative to the table of the machine.

The "View" menu manages the visualisation of application toolbars.

The "Simulation" menu is one of the most interesting. The item "Compute"
launches calculation. "Number of iterations" gives the maximal number of
iterations the algorithm performs to converge. "Delay" allows to modify
the interval time between two steps during an animation. "Open, Save a
joint coordinate file" is useful to store or retrieve a joint coordinates
file and thus to simulate, in the same document other results. Finally,
the "Options" item opens the following dialog window (cf. figure 2). For
details on the different computation options, see section 5.

The "Path" menu allows defining the tool path for which the machine joint
coordinates will be computed. With the first item "Path from the outer
wire of a face", the user has just to select a face in the 3D view and a
routine extracts the outer wire of this face and automatically orders its
edges so that the tool path will be continuous. With the second item
"Custom path from one face and some of its edges", the user has to select
a face and then to select one or more edges of this face. When a tool path
is generated, the Cartesian coordinates (position and orientation) can be
saved with "Save a Cartesian points file". That path can also be hidden
or visualised in the 3D view with either "Show path" or "Hide path". Finally,
the first and the last point (and orientation) of the path can be edited.

The "Machine " menu allows to show ("Mean joint coordinates") and edit
("Edit the machine") the joint coordinate limits. However, in the current
release of the application, these information are not taken into consideration.

The "Tool" menu allows to edit the length and the diameter of the tool. For
the sake of simplicity, the application considers a unique milling tool with
a spherical end.

The 3D view allows to represent and simulate the milling process. A set of
functionalities has obviously been implemented in order that the user can
easily navigate into this view and modify the shape attributes. The above
toolbar allows to zoom the whole scene, zoom in/out, and pan the view. Then,
a set of six icons are connected to projection views. The next one allows
to rotate the view while the next one resets the view as it was at the
opening of the application (isometric view). Then, a set of three icons
allows to modify the graphical attributes of a selected shape : colour,
shading/wire-frame representation. The next two icons enables the HLR (hidden
line removal) representation of the scene. Finally, the last four ones enables
the selection of topological entities respectively by shape, vertex, edge and face.
Moreover, some shortcuts were implemented :
Ctrl + Left Button ŕ Rotate the view
Ctrl + Middle Button ŕ Pan the view
Ctrl + Right Button ŕ Zoom in/out

After computation, the animation toolbar allows to navigate along the tool
path. From the left to the right, the icons allows to : move to the first
step, go to the previous step, a reversed animation, a forward animation,
go to the next step, move to the last step and stop an animation.
The tree view allows to manage the tool path by editing the starting and
the ending point, remove useless edges and so on. By right-clicking on an
entity, depending on its type, a corresponding popup menu appears :

The popup menu for a point allows to edit its position and its orientation.
"Reach pose" moves the machine in order that the tool reaches this pose.

The popup menu for a face allows to compute its surface properties (area,
centre of gravity, matrix of inertia). More, the face can be deleted from
the tree view.

The popup menu for an edge allows to compute its linear properties (length, …),
to remove it from the path and to highlight it in the 3D view.
Currently, no drag'n'drop operation is possible and the path is limited to the
starting point, some edges that belong to one face and the ending point.
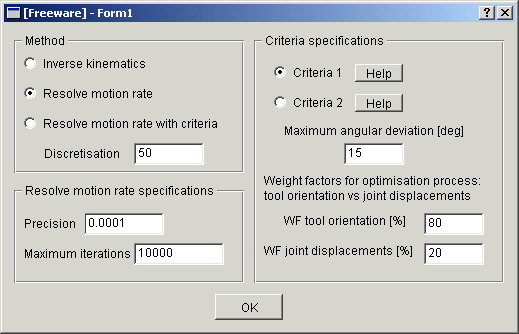
In this section, some explanations about the content of the option dialog window
are given. Three different algorithms allows to compute the joint coordinates of
the machine tool in order that the tool moves along the selected path.
The two first algorithms (Inverse Kinematics and Resolve Motion Rate) provide
very close results. The first one is the fastest but, in some cases, in the
joint coordinates space, the coordinates may not be continuous, whereas the
resolve motion rate minimizes the displacement between two close poses (use
of the Jacobian matrix of the machine). The third algorithm is the most
interesting one as it offers two optimization criteria.
The Inverse Kinematics approach is supposed to be known. Generally, the inverse
kinematics problem is difficult to solve but, in the case of a 5-axes milling
machine, the equations could be easily found. Resolve Motion Rate Control (RMRC) [1]
is a local method that can express a small change in q (the joint coordinate space)
for a small change in X (the Cartesian space, i.e. in which the position and the
orientation of the tool are expressed). It uses the Jacobian J of the forward
kinematics to describe a change of the tool's pose as :
 (1)
(1)
This equation can be solved for  by taking the inverse
of J if it is square and non singular. But, in face of redundancies (when J
is not square), pseudo-inverse methods are a common choice to invert the equation
(1), for which J-1 becomes J# = (JT x J)-1 x JT and the solution of (1) is now :
by taking the inverse
of J if it is square and non singular. But, in face of redundancies (when J
is not square), pseudo-inverse methods are a common choice to invert the equation
(1), for which J-1 becomes J# = (JT x J)-1 x JT and the solution of (1) is now :
 (2)
(2)
More, some researches suggested a more general form of optimization for (2) by
minimizing an explicit objective function h in the null space of J :
 (3)
(3)
In the application, equation (2) is used to compute the joint coordinates when
the selected simulation option is "Resolve Motion Rate", whereas equation (3)
corresponds to "Resolve Motion Rate with criteria".
At this point, h has not been defined. In the application, h is a task the tool
must perform. The chosen form of h is :
 (4)
(4)
where  represents the mid-joint positions for
the machine, W is a diagonal weighting matrix (a weight factor is attributed
to each axis), while of and w0 are defined as the unit vector along the desired
final tool orientation and its corresponding positive weight. Clearly, this
optimization problem allows the centre of the ball end-mill to remain on the
tool path, while keeping the joint positions at the closest distances from
the mid-joint positions as well as keeping the tool axis at the smallest
deviation from the preferred orientation.
represents the mid-joint positions for
the machine, W is a diagonal weighting matrix (a weight factor is attributed
to each axis), while of and w0 are defined as the unit vector along the desired
final tool orientation and its corresponding positive weight. Clearly, this
optimization problem allows the centre of the ball end-mill to remain on the
tool path, while keeping the joint positions at the closest distances from
the mid-joint positions as well as keeping the tool axis at the smallest
deviation from the preferred orientation.
In the option dialog box, there are two different choices for the optimization
criteria. There is a small difference between both. The first one is the true
implementation of equation (4) whereas, the second one takes into account the
local geometry of the face to be milled, i.e.
corresponds to the joint coordinates computed with the inverse kinematics algorithm
for the mean pose of the tool path. This pose is never reached by the tool
but it is an estimation of the region around which the machine will move (in the
joint coordinates space) for the milling process. Therefore, when the part is far
from the mid-joint coordinates, this criteria provides better results. More details
can be found in the documentation (in French) of the MFC based version
of this application.
The parameters that can be modified in the dialog box are :
Some examples are given in order to test the application. One of the most interesting
is certainly the simulation of the outer wire of a Bezier face:
The first animated picture shows a simulation with the inverse kinematic algorithm.


The following picture shows the results obtained with a RMRC with criteria algorithm,
with 15° as maximal angular deviation, WFo=80% and WFj=20%. Clearly, the C-axis is
the one moving the more. As this joint has no limit, its weighting factor is small relative
to the other axes and hence, the algorithm tends to use this axis in order to cenverge
while considering joint displacements and tool orientation constraints.
The following file contains the source, the executable and some samples. A "makefile" is added.
It should compile under Linux (not tested). Download.
Note that QT 2.3, the STL library and OpenCascade 4.0 are required.
I hope I will have time to continue the development of this application. The exe file of the QT version is named "RobotSimul". It is quite ambitious for the moment ! But, I am working on an extension of this application that aims to describe a machine with its Denavit-Hartenberg parameters and to take into account more complex tool paths.
[1] Baron Luc, "An optimal surfacing post-processor module for 5-axes CNC milling machine", Ecole Polytechnique de Montréal, 2000.